
Simply Me Sweater – Crochet V-Neck Sweater Pattern
Meet the Simply Me Sweater!
You know those sweaters you just throw on without thinking twice, and somehow they always make you feel good? That's exactly what I had in mind when designing this one!
I wanted something simple, cozy, and comfortable, but still with a little personality. Nothing too fancy, nothing complicated. Just a sweater that feels like me. And that's actually how the Simply Me Sweater got its name!
With its relaxed fit, beautiful moss stitch texture, and V-neckline, this crochet V-neck sweater pattern is all about enjoying the little things, like creating something with your own hands and then actually getting to wear it!
Because sometimes, simple is exactly what we need. ❤️
If you'd like to support my work and get a printable, ad-free version of this pattern, please visit my shop or Ravelry.
HUGE THANKS to everyone who supports me through purchases, likes, shares, comments, tags, or feedback! It truly means a lot to me.

This post contains affiliate links for the yarns I used and love and it also displays ads. I make a small commission if you purchase through these links or through the Ads which in no way affects the cost to you. The revenue I receive from Ads, and affiliate links, help me to support my small business which allows me to share my free crochet patterns/content with you. Thank you for your understanding and your support! It means a lot to me.
This pattern and all images associated with this pattern cannot be sold or claimed as your own. You are allowed to sell finished project. Feel free to mention me for creating this pattern, it would make my day and I can share your finished project on my social media if you allow.
Don’t forget to share your project on Instagram! If you have your account you can tag me under @happyheartsy. I would love to see your finished Simply Me Sweater so I can share it with others.
Before we get into the pattern, I also created The Ultimate Crochet Hack Sheet, a handy 2-page PDF designed to keep your crochet essentials in one place.
Inside, you'll find crochet abbreviations and symbols, hook size conversions (US and UK), yarn types with recommended hook sizes and project ideas, and other quick-reference guides that are useful to keep nearby while crocheting.
Feel free to click on the image below or visit my shop to learn more.
Materials:
Yarn
Approx. Yarn Needed:
XS: 1,700 yd / 1,555 m
M: 1,900 yd / 1,738 m
L: 2,100 yd / 1,920 m
XL: 2,300 yd / 2,103 m
2XL: 2,500 yd / 2,286 m
3XL: 2,700 yd / 2,469 m
4XL: 2,900 yd / 2,652 m
5XL: 3,100 yd / 2,835 m
Hooks - 4mm / G/6
Scissors, Yarn Needle, Stitch Marker (optional)
Gauge - 4" x 4" = 21sts x 19rows (worked in Moss Stitch using a 4 mm hook)
The sizing guide follows size XS, (S, M, L, XL, 2XL, 3XL, 4XL, 5XL). E.g. 95 (103, 115, 123, 135, 147, 155, 167, 179) sts means 95 for XS, 103 for S, 115 for M, 123 for L, 135 for XL, 147 for 2XL, 155 for 3XL, 167 for 4XL, 179 for 5XL)
Final measurements for this sweater for all sizes in inches:
Final Width: 18 (20, 22, 23.5, 26, 28, 29.5, 32, 34)"
Final Length: Approx. 26" for all sizes
NOTES:
This pattern is made using Moss Stitch and Single Crochet Back Loop Only Ribbing.
Read carefully when the turning ch(s) count as a stitch and when they are only used as turning chains.
Ch-1 spaces in Moss Stitch count as a stitch.
The ch 2 at the end of a regular Moss Stitch row counts as SC + ch 1 for the following row.
Stitch markers are optional but highly recommended, especially when working the V-neck shaping and marking the armholes.
The pattern is designed with approximately 5–6" of positive ease for a relaxed fit.
Abbreviations:
Ch - chain
FCH - foundation chain
FSC - foundation Single Crochet
St - stitch
SC - Single Crochet
SC2tog – Single Crochet 2 Together
Ch Sp - Chain Space
BLO - Back Loop Only
Sk St - Skip Stitch
Sl St - Slip Stitch
Directions for Simply Me Sweater
BACK PANEL
Ch 96 (104, 116, 124, 136, 148, 156, 168, 180) sts. Continue with ROW 1.
OR
FSC ROW - 95 (103, 115, 123, 135, 147, 155, 167, 179) sts. Ch 2. Turn. Continue with ROW 2.
ROW 1 - SC in the 2nd ch from the hook and in each ch across. Ch 2. Turn. (Total 95 (103, 115, 123, 135, 147, 155, 167, 179) sts
ROW 2 - Skip the first 2 sts, SC in the next st, ch 1, skip the next st. SC in the next st, ch 1, skip the next st. Repeat from to across, ending with a SC in the last st. Ch 2. Turn.
ROW 3 - SC in the first ch-1 space, ch 1. SC in the next ch-1 space, ch 1. Repeat from to across, ending with a SC in the last ch-1 space. Ch 2. Turn.
ROW 4 - ROW 104 (for all sizes) - Repeat ROW 3
Fasten off and weave in ends.
NOTE: This pattern uses Moss Stitch throughout. If you are unfamiliar with Moss Stitch, a detailed written tutorial is included at the end of the pattern. 6:44 - BACK PANEL – Moss Stitch

FRONT PANEL
Ch 96 (104, 116, 124, 136, 148, 156, 168, 180) sts. Continue with ROW 1.
OR
FSC ROW - 95 (103, 115, 123, 135, 147, 155, 167, 179) sts Ch 2. Turn. Continue with ROW 2.
ROW 1 - SC in the 2nd ch from the hook and in each ch across. Ch 2. Turn. (Total 95 (103, 115, 123, 135, 147, 155, 167, 179) sts
ROW 2 - Skip the first 2 sts, SC in the next st, ch 1, skip the next st. SC in the next st, ch 1, skip the next st. Repeat from to across, ending with a SC in the last st. Ch 2. Turn.
ROW 3 - SC in the first ch-1 space, ch 1. SC in the next ch-1 space, ch 1. Repeat from to across, ending with a SC in the last ch-1 space. Ch 2. Turn.
ROW 4 - ROW 70 (68, 66, 64, 62, 62, 60, 60, 58) - Repeat ROW 3
Do not fasten off. Continue directly with the V-Neck Shaping below.
V-Neck Shaping
Once you finish the last row above, find the middle stitch of your Front Panel: 48th (52nd, 58th, 62nd, 68th, 74th, 78th, 84th, 90th) st, and place a stitch marker in it. This will mark the centre of your V-neck and divide the Front Panel into two sides.

You will work the right side of the neckline first. There is no need to fasten off. Simply continue with the next row.
Front Panel RIGHT NECKLINE
ROW 71 (69, 67, 65, 63, 63, 61, 61, 59) – Continue working in Moss Stitch as before until you have 3 sts remaining before the marked centre stitch. These should be SC, ch-1 space, SC. Ch 1 after the first SC as you normally would in Moss Stitch. You will now have the ch-1 space and last SC remaining before the marked centre stitch.

Work a SC2tog over these 2 sts: Insert your hook into the ch-1 space and pull up a loop. Keep the loops on your hook, insert your hook into the next SC and pull up a loop. You should have 3 loops on your hook. YO and pull through all 3 loops.
Leave the marked centre stitch unworked. Ch 1. Turn.
ROW 72 (70, 68, 66, 64, 64, 62, 62, 60) – The ch 1 from the previous row is only a turning chain and does not count as a stitch.
Work a SC2tog over the first SC and the next ch-1 space. This decrease counts as your first stitch of the row. It is highly recommended to place a stitch marker in this stitch, as it marks the neckline edge and will be the last stitch you work into on the following row.
Ch 1, then continue working in Moss Stitch across the row by working a SC in the next ch-1 space, ch 1, and repeating across. Ch 2. Turn.
NOTE: All decreases are made along the neckline edge only, never along the outer edge of the Front Panel.
ROW 73 (71, 69, 67, 65, 65, 63, 63, 61) – ROW 104 – Continue working in Moss Stitch, decreasing along the neckline edge only on every row in the same way as shown above. At the end of ROW 104, you should have 13 (15, 19, 21, 25, 31, 33, 39, 43) sts remaining.
Fasten off and Leave a longer tail at the end to use for seaming the FRONT and BACK Panels together.

Front Panel LEFT NECKLINE
Now you will work the left side of the neckline.

Join your yarn in the first stitch next to the marked centre stitch (do not work into the marked centre stitch), as if you were continuing the same row from the Right Neckline. You will begin with a decrease right away since you are starting at the neckline edge.

Insert your hook into the first stitch, YO and pull up a loop, then make a ch to secure the yarn. Ch 1.
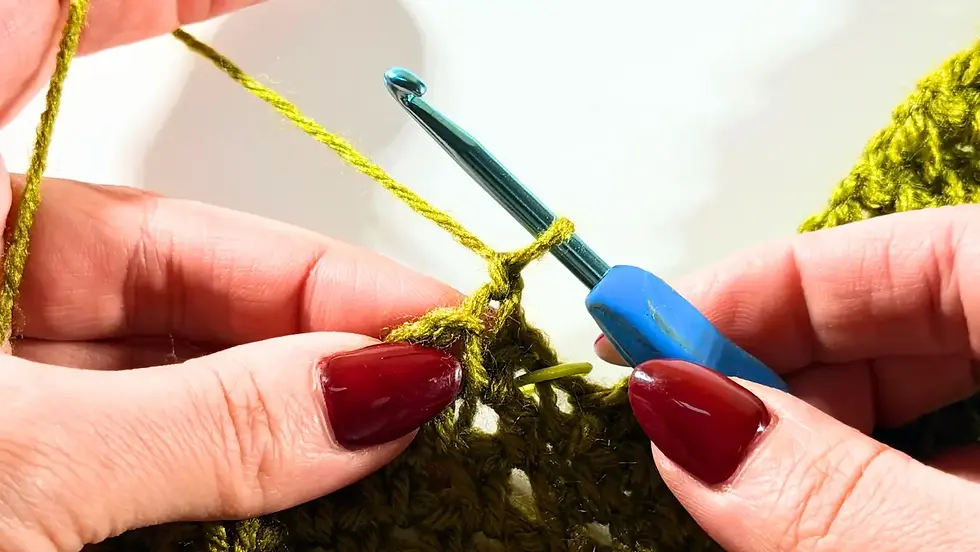
Insert your hook into the same stitch, YO and pull up a loop. Keep the loops on your hook, insert your hook into the next ch-1 space and pull up a loop. You should have 3 loops on your hook. YO and pull through all 3 loops to complete the SC2tog.
Place a stitch marker in this decrease stitch. Ch 1, then continue working in Moss Stitch across the row, working a SC in the next ch-1 space, ch 1, and repeating across. Ch 2. Turn.
On the following row ROW 72 (70, 68, 66, 64, 64, 62, 62, 60), continue working in Moss Stitch across until you reach the neckline edge, then make your decrease at the end of the row in the same way as you did for the Right Neckline.
Continue working back and forth, decreasing along the neckline edge on every row, alternating between a decrease at the beginning and at the end of the row.
NOTE: All decreases are made along the neckline edge only. The outer edge of the Front Panel remains straight.
ROW 104 - At the end of ROW 104, you should have 13 (15, 19, 21, 25, 31, 33, 39, 43) sts remaining.
Fasten off and Leave a longer tail at the end to use for seaming the FRONT and BACK Panels together.
Seaming the FRONT and BACK Panels
Once you have both panels completed, place the FRONT and BACK Panels together with the tops aligned.
NOTE: Make sure both panels are oriented the same way, with the same side facing out, so the bottom edges match.
Starting from the outer edge, count 13 (15, 19, 21, 25, 31, 33, 39, 43) sts along the BACK Panel. This should match the number of stitches remaining on each side of your FRONT Panel after completing ROW 104.
Place a stitch marker through both panels to mark where your shoulder seam will end.
Invisible seam
For seaming the panels, I used the invisible seam technique.
Thread the yarn tail through a yarn needle and work through the top stitches, right underneath the “V” of each stitch. Insert the needle through one side, then through the other side, and gently pull the yarn to bring the panels together.
RIBBING AROUND THE NECKLINE
In the picture below, the arrows indicate how the ribbing is done and in what order.

Let’s start with Section 1. Measure approximately 3" from the centre of the neckline along the right side. Place a stitch marker at this point (A), or join your yarn right away using the same method as you did when starting the LEFT side of the FRONT Panel.
ROW 1 – Work SC evenly across the row until you reach the neckline edge (the bottom of the V). I personally had 12 sts, but your stitch count may be different, and that is absolutely OK! 😊
Once you reach the neckline edge, make a Sl St into the side of the neckline to attach the ribbing. Make another Sl St into the next space above. This second Sl St acts as your ch 1 turning chain. Turn.
ROW 2 – SC in BLO of each SC stitch across the row, excluding the SL STs used to join the ribbing to the neckline. Ch 1. Turn.
ROW 3 – SC in BLO of each SC stitch across until you reach the neckline. Make 2 SL STs into the side of the neckline: the first SL ST joins the ribbing to the neckline, and the second SL ST acts as your ch 1 turning chain. Turn.
Repeat ROW 2 and 3 until you reach the BACK Panel. Then seam the ribbing to the BACK Panel. A whip stitch worked from the wrong side is perfectly fine.
NOTE: The ribbing will overlap slightly at the corner of the V-neck, but DON’T worry! 😊 Once you wear the sweater, it lays nicely without creating a scrunched look.
Now let’s move to Section 2, the opposite side. This time, you will start at the BACK Panel and work towards the centre of the V-neck.
Count the same number of ribbing stitches along the BACK Panel as you made on the first side, and join your yarn at Point B, as shown in the pictures.

Work the ribbing exactly the same way as you did before. Once you reach the ribbing on the opposite side, STOP joining the rows to the neckline. Instead, ch 1 as a turning chain and continue working the ribbing to create the
overlapping flap.
Once you reach the ribbing on the opposite side of the neckline, fasten off and leave a slightly longer tail. Use this tail to seam the two sides of the ribbing together until you reach the part of the ribbing that is already joined to the sweater.
Now you have both sides of the neckline ribbing finished! Using exactly the same method, make the ribbing along the BACK Panel, starting at either side (Point C) and working across to the opposite side.
For the BACK Panel ribbing, make it half the width of the neckline ribbing. I made 6 sts instead of 12. If you used a different number of sts for your neckline ribbing, simply use half that number.
Once you reach the opposite side of the neckline, fasten off, leaving a longer tail for seaming. Use this tail to join the BACK Panel ribbing to the neckline ribbing on that side. Weave in the remaining ends.

SLEEVES 2x
Both sleeves are made exactly the same way.
Start by measuring the armhole: 13 (14, 15, 16, 17, 18, 19, 20, 21)" total. This measurement goes across both the FRONT and BACK Panels, with the shoulder seam in the centre.
For the armhole placement, use the actual measurement of your finished panels rather than calculating it from the gauge.
Starting at the shoulder seam, measure 6.5 (7, 7.5, 8, 8.5, 9, 9.5, 10, 10.5)" down the side of the first panel. Count how many rows are within this measurement.
From the shoulder seam, count the same number of rows down the opposite panel. Repeat the same process for the second sleeve so both armholes are even.
Mark the bottom of each armhole with stitch markers.

FITTING CHECK: After placing your stitch markers, I highly recommend trying the sweater on! While wearing it, bring the stitch markers together under your arm to check if you have enough room for a comfortable fit.
If the armhole feels too small or too large, feel free to use the armhole measurement from a different size. Just make sure to use the same measurement for both sleeves.
ROW 1 – Join your yarn at one of the stitch markers marking the bottom of the armhole. Ch 1 and SC into the first stitch. Continue working evenly in Moss Stitch across the armhole for a total of 69 (73, 79, 85, 89, 95, 101, 105, 111) sts. Ch 2 and turn.
NOTE: Because you are working into the sides of the rows, the one stitch per row rule does not apply. You will have more stitches than rows, and even though the stitch count might feel like a lot, that is absolutely OK!
Try to divide the total stitch count as evenly as possible, working approximately half of the stitches along one panel and the other half along the second panel.
ROW 2 – ROW 39 (36, 30, 24, 29, 23, 17, 17, 11) – Continue working in Moss Stitch as before. At the end of the final row, ch 1 instead of ch 2 and turn. This prepares you for the first decrease at the beginning of the next row, using the same method as for the neckline.
ROW 40 (37, 31, 25, 30, 24, 18, 18, 12) - ROW 76 (76, 76, 76, 81, 81, 81, 81, 81) - Continue working in Moss Stitch. Start decreasing at the beginning of the row only. Each decrease removes 2 sts. Decrease ONLY every 3rd ROW! Work all other rows in Moss Stitch as before. At the end of the final row, you should have 43 (45, 47, 49, 53, 55, 57, 61, 63) sts remaining.
NOTE: Each decrease row removes 2 sts from the total stitch count. This is because we're working in Moss Stitch, where both SC and ch-1 spaces count as stitches. By making ch 1 instead of ch 2 when turning and working SC2tog at the beginning of the next row, we reduce the total stitch count by 2, not just 1.
NOTE: Insert a stitch marker into the first decreased stitch. This will help you clearly see where to work your last stitch on the following row.
IMPORTANT! Normally, you would work your last SC into the last ch-1 space. However, because the decreased stitch is wider, doing this can make the side of the sleeve look uneven. Instead, work a SC2tog over the last ch-1 space and the marked decrease stitch. This creates a smoother edge.
Your stitch count does not change, as you are still ending the row with one stitch.
The next row is worked regularly in Moss Stitch without any decreases. The following row is the third row from your previous decrease row, so decrease again at the beginning of the row.
Continue repeating this sequence throughout the entire sleeve, decreasing every 3rd row.

CUFF 2x
Once you finish your last stitch of the sleeve, continue with the cuff right away.
Ch 13
ROW 1 –SC in the 2nd ch from the hook and in each ch across. 12 sts total.
Make a Sl St into the first ch sp along the edge of the sleeve to join the ribbing. Make another Sl St into the next ch sp, which counts as your turning chain. Turn.
ROW 2 – SC in BLO across the row. Ch 1. Turn.
ROW 3 – until the end of the sleeve – Continue working the ribbing in the same way. Each time you reach the sleeve edge, make 1 Sl St into the next ch sp to join the ribbing, then make a second Sl St into the next ch sp above, which counts as your turning chain. Turn and continue working SC in BLO across.

Once you are done with the ribbing, secure the last stitch and pull up a long tail, long enough to seam the entire side of the sweater from the cuff all the way to the bottom of the sweater. Turn the sweater wrong side out, fold it in half, and align the sleeves and the FRONT and BACK Panels. Seam everything together using a whip stitch, starting at the cuff and continuing all the way down to the bottom of the sweater. 1:07:26 - Seaming the Sides
Then make the second sleeve exactly the same way.

BOTTOM RIBBING
Once your sleeves are done and your sweater is completely seamed together, you have just one last thing to make! The ribbing all around the bottom!
Start at either side of the sweater. Join your yarn and ch 13. This will create the same width of ribbing as the cuffs and neckline.
Work the ribbing back and forth in SC BLO, just as you did for the cuffs and neckline. Each time you return to the bottom edge of the sweater, you will attach the ribbing using SL STs.
You have 2 options for how you would like the bottom ribbing to fit:
OPTION 1 – Slightly Scrunched / Fitted Look
For a more scrunched but still nicely fitted look, skip the first stitch next to your previous joining point when attaching the ribbing to the bottom edge of the sweater.
Make a SL ST into the second stitch, then make 2 more SL STs into the next 2 stitches along the bottom edge.
Turn and continue working in SC BLO across the ribbing as before.
Repeat this process each time you return to the bottom edge of the sweater.

OPTION 2 – Straight / Relaxed Look
If you want to keep the sweater in the same straight shape without the scrunched look, join the row with a Sl St into the first st along the bottom edge of the sweater, then make 2 more Sl Sts and turn. Continue working in SC BLO as before.
Continue with your chosen option all the way around the bottom of the sweater.
Once you reach the starting point, fasten off, leaving a longer tail for seaming. Use this tail to seam the two ends of the ribbing together, then weave in all remaining ends.

Ta-Da! Your Simply Me Sweater Is Done! ☀️👜
I hope you enjoyed making this sweater as much as I enjoyed designing it! I would absolutely love to see how yours turned out, so don't forget to tag me @happyheartsy on social media or share your finished sweater with me!
Happy crocheting!
Lenka
Where happy heart meets crochet art


Comments