
Crochet Wall Hanging Pockets
- Sep 8, 2022
- 4 min read
Updated: Nov 7, 2023
Currently I am into a home décor and improving my walls. Who already knows me, you are right, it's a boho style décor.
I needed something for the keys or little things that you just don't know where to put them so I had an idea about wall hanging pockets. Something simple because simplicity is the best and something on a wall so I can fill the empty space.
I think I nailed it! I already made myself two wall hanging pockets that fulfill their purpose.
If you'd like to support my work and get this printable ad free pattern here are the links where you can purchase my pattern. You can find this crochet wall hanging pockets pattern on my Etsy, Ravelry, Ribblr It or Love Crafts
If you enjoy my crochet content but you don't feel like to purchase my patterns it's absolutely ok.:) That's why my patterns are free on my blog so it can be available for everyone!
There's also another way though how to support my work with Buy Me a Coffee (my version is Buy Me Yarn, you know why:) ). It cost you even less than my actual patterns. You can check the link above or the button below for more details.
BIG THANKS for everyone who supports me by purchases, likes, shares, comments, tags or/and feedbacks! It means a lot to me.
This pattern also comes with an additional YouTube video tutorial so if you are a visual learner I've got you covered.
Also, feel free to tag me on my IG or FB once you finish your wall hanging pockets. I would love to see it and share it with others :)
Now, let's get started. :)
What you need for this wall hanging pockets:
Yarn - I used 100% cotton yarn from Bernat Handicrafter Off White colour, approx. 4oz/115g (3 skeins)
Hook - 5mm / H-8
Wooden Ring - 2.5” (7cm) diametral
Scissors, Yarn Needle
Why I use cotton yarn:
Everyone has different preferences when it comes to type of yarns for certain projects. I definitely prefer cotton yarn to any other for home décor such as wall hangings pockets or anything that will carry some things (like water bottles, little groceries etc), coasters, dishcloths etc. It's simply because cotton doesn't stretch too much and it handles anything hot subjects like mugs with hot drinks.
Gauge:
13.5 sts x 16 rows = 4” x 4”
Dimensions:
7” x 17” with the wooden ring
Abbreviations:
Ch - Chain
SC - Single Crochet
Sts - Stitches
Dec - Decreasing
2SCtog - 2 single crochet together in one stitch (decreasing)
3SCtog - 3 single crochet together in one stitch (decreasing)
Directions:
Bottom pocket:
Before you start your first row of foundation SC chain or foundation chain, keep your tail little bit longer as with this tail you will sew your bottom pocket.
Row 1 - 70 FSC chain (or 71 chain, SC into the second ch from the hook, SC until the end of the row), ch 1 (turning chain only, does NOT count as a first SC), turn.
Row 2 - 2SCtog (dec), SC until you have 2 sts left, 2SCtog (into the last 2 sts, dec), ch 1, turn. In total you get 68 sts.
Row 3 - Row 25 - Repeat Row 2. Each row you have about 2 sts less than in previous row. In Row 25 you get 22 sts in total.
Row 26 - 28 - SC in every stitch (no decreasing). In total 22 SC.
Keep a long tail after you secure your last row as with this tail you will sew the bottom pocket to the upper one.
Upper pocket:
Before you start your first row of foundation SC chain or foundation chain, keep your tail little bit longer as with this tail you will sew your bottom pocket.
Row 1 - 70 FSC chain (or 71 chain, SC into the second ch from the hook, SC until the end of the row), ch 1 (turning chain only, does NOT count as a first SC), turn.
Row 2 - 2SCtog (dec), SC until you have 2 sts left, 2SCtog (into the last 2 sts, dec), ch 1, turn. In total you get 68 sts.
Row 3 - Row 25 - Repeat Row 2. Each row you have about 2 sts less than in previous row.
In Row 25 you get 22 sts in total.
Row 26 - SC in every stitch (no decreasing in this row). In total 22 SC.
Row 27 - 3SCtog (dec), SC until you have 2 sts left, 3SCtog (into the last 3 sts, dec). ch 1, turn. In total you get 18 sts.
Row 28 - Row 29 - Repeat Row 27. Row 29 has in total 10 sts)
Row 30 - 2SCtog (dec), SC until you have 2 sts left, 2SCtog (into the last 2 sts, dec), ch 1, turn. In total you get 8sts.
Row 31 - SC in every stitch (In total 8 sts)
Keep a long tail after you secure your last row as with this tail you will attach the wooden ring.
How to sew the parts together:
Notes
1) First, we sew each pocket separately.
2) Fold the left wing first to the right bottom corner and then the right wing over the left one to the bottom left corner. See the picture below.

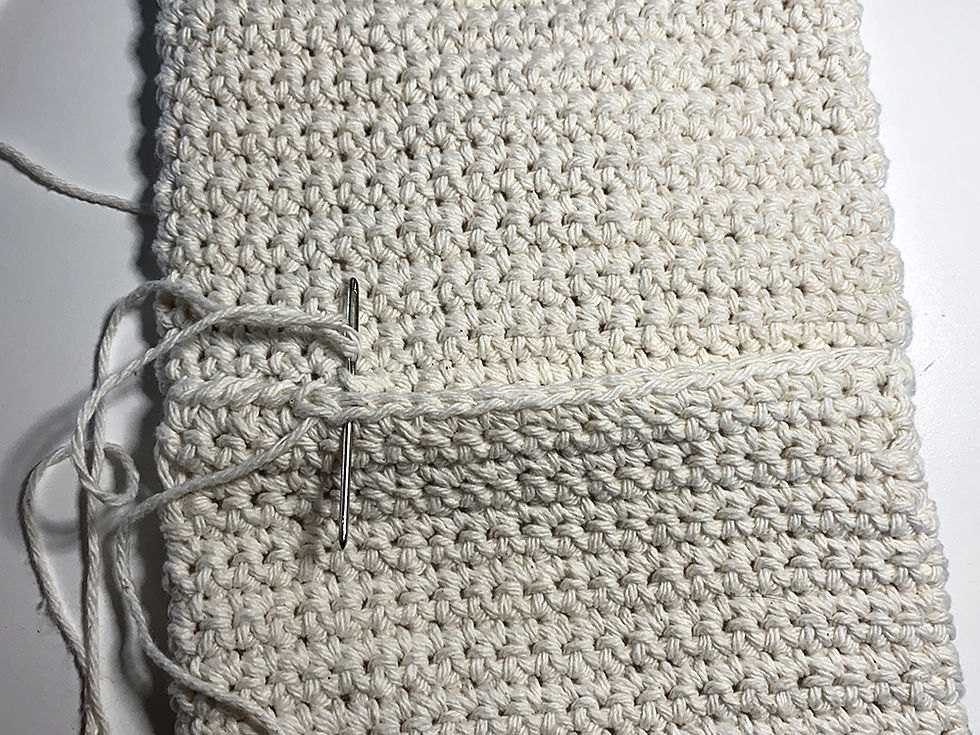
3) Now sew the bottoms of the pockets through each stitch of all three parts (left wing, body, right wing). Please, see the pictures below.


4) Once you have both bottom pockets sewed together, flip them, so you can see their back side. Make sure, the top pocket is on top and bottom pocket is under the top one. Now overlap your bottom pocket over the top pocket as you can see on the picture below and sew it together.

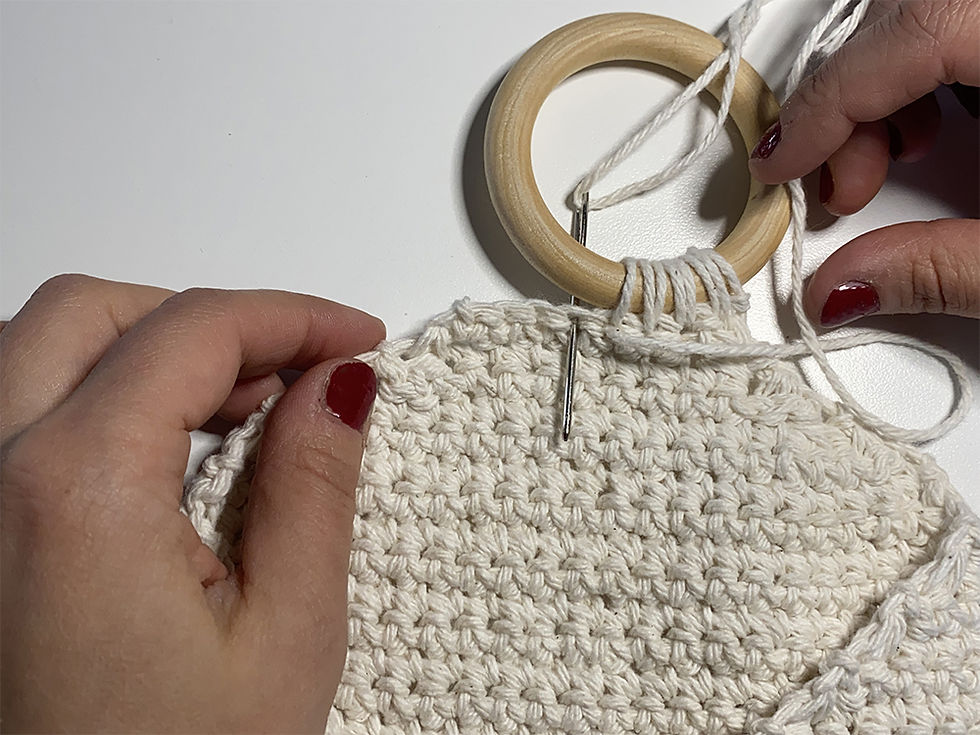
5) Now we are at our last part:) Grab the wooden ring and attach it to the top. Insert your yarn needle into the one stitch twice so two loops come from each stitch. Please, see the picture below.
Tada. You made your wall hanging pockets. Feel free to share your finished project with me as I am super excited to see it and share it with others. I hope you enjoyed this pattern.


This pattern and all images associated with this pattern cannot be sold or claimed as your own. Feel free to sell your finished project and if you mention me and give me a credit for the pattern I would really appreciate it <3 .


Hi I made your pattern and really enjoyed it. I did think it would come out larger but it’s perfect
Good thorough directions. Great pattern. Thanks!