
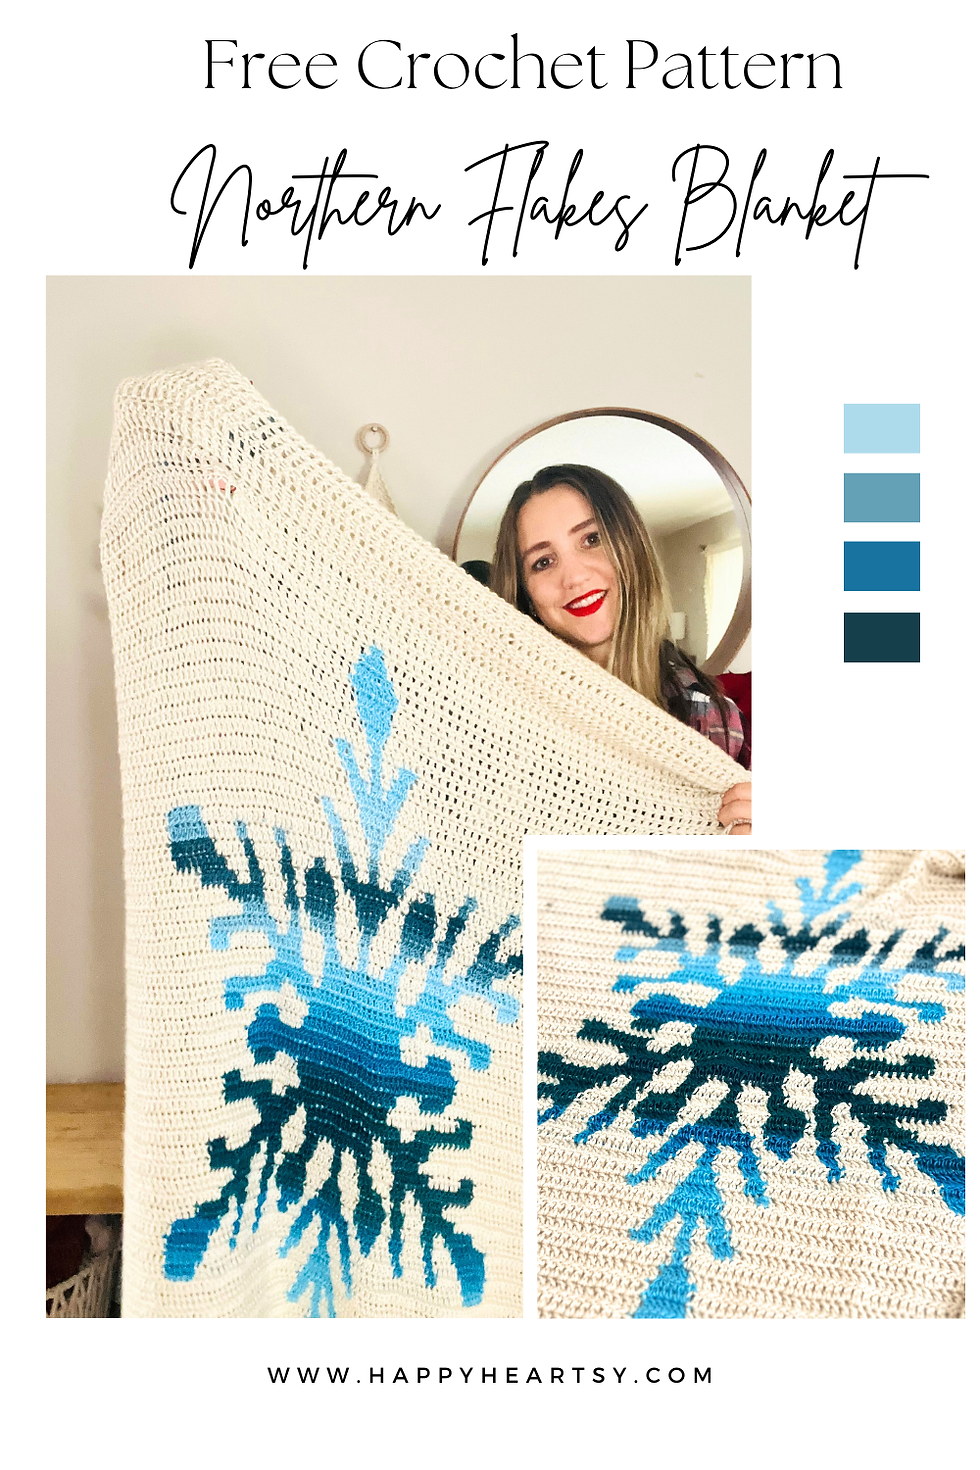
Northern Flakes Blanket – Free Crochet Graphghan Pattern + Video Tutorial
- Dec 1, 2025
- 8 min read
Updated: Dec 18, 2025
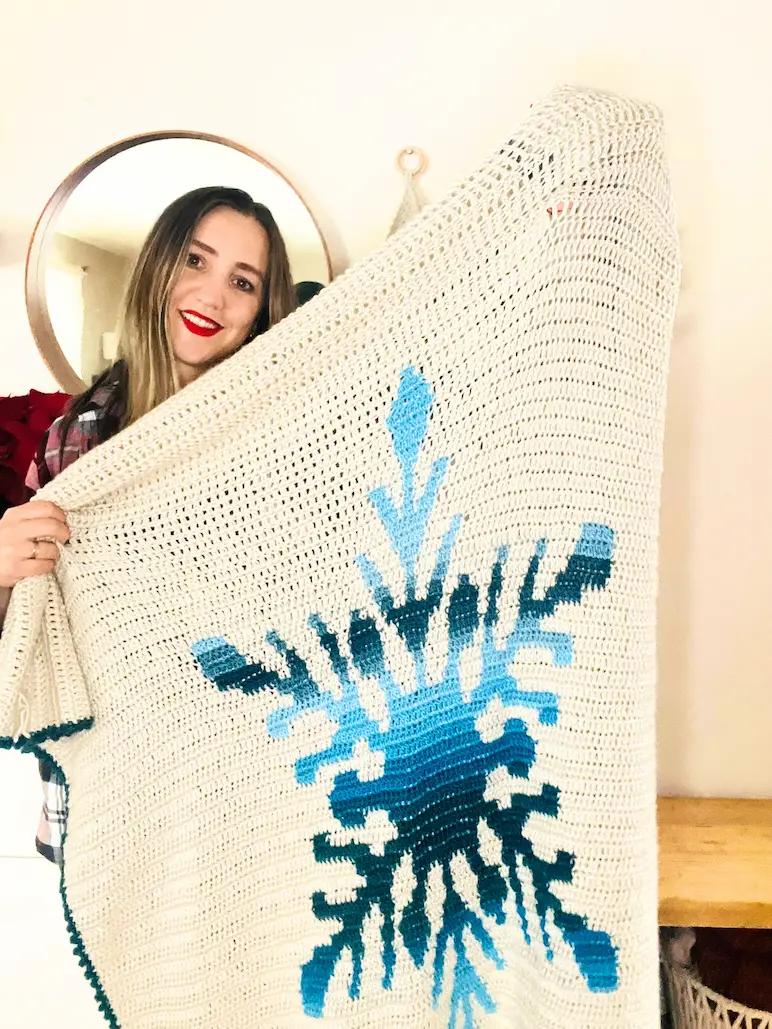
There’s something magical about winter that always inspires my crochet hook to move a little slower, a little softer — almost like the stitches want to turn into snowflakes on their own. ❄️And that’s exactly how the Northern Flakes Blanket was born.
This blanket has been such a joy to create, from choosing the shades of icy blues to watching the snowflake take shape one row at a time. It’s cosy, simple, and full of that peaceful winter feeling I love so much. I’m so excited to finally share this pattern with you — for free — so you can enjoy the same calm, meditative rhythm of crocheting it.
Whether you’re making it for your home, a loved one, or just because you need a comforting project for chilly days, I hope this blanket brings you as much happiness as it brought me.Grab your yarn, get comfy, and let’s crochet something beautiful together.
If you'd like to support my work and get a printable, ad-free version of this pattern, please visit my shop or Ravelry.
If you like my crochet content but aren't interested in buying my patterns, that's perfectly fine. :) I offer my patterns for free on my blog so everyone can access them!
Additionally, there's an alternative way to support my work through Buy Me a Coffee (in my case, it's Buy Me Yarn, and you know the reason:) ). It's even cheaper than my current patterns. For more information, you can click the link above or the button below.
HUGE THANKS to everyone who supports me through purchases, likes, shares, comments, tags, or feedback! It truly means a lot to me.
This post contains affiliate links for the yarns I used and love and it also displays ads. I make a small commission if you purchase through these links or through the Ads which in no way affects the cost to you. The revenue I receive from Ads, and affiliate links, help me to support my small business which allows me to share my free crochet patterns/content with you. Thank you for your understanding and your support! It means a lot to me.
This pattern and all images associated with this pattern cannot be sold or claimed as your own.
You are allowed to sell finished project. Feel free to mention me for creating this pattern, it would make my day and I can share your finished blanket on my social media if you allow.
Don’t forget to share your project on Instagram! If you have your account you can tag me under
@happyheartsy. I would love to see your finished Northern Flakes Blanket so I can share it with others.
Before we get into the actual pattern I also created the Ultimate Crochet Hack Sheet! It's 2 pages with basic
crochet abbreviations and symbols, hook sizes in US and UK version, all the yarn types (with recommended hooks and projects) etc. Feel free to click on the pic or a link to my shop where you can find more details.
What you need for this Northern Flakes Blanket:
Materials:
Yarn
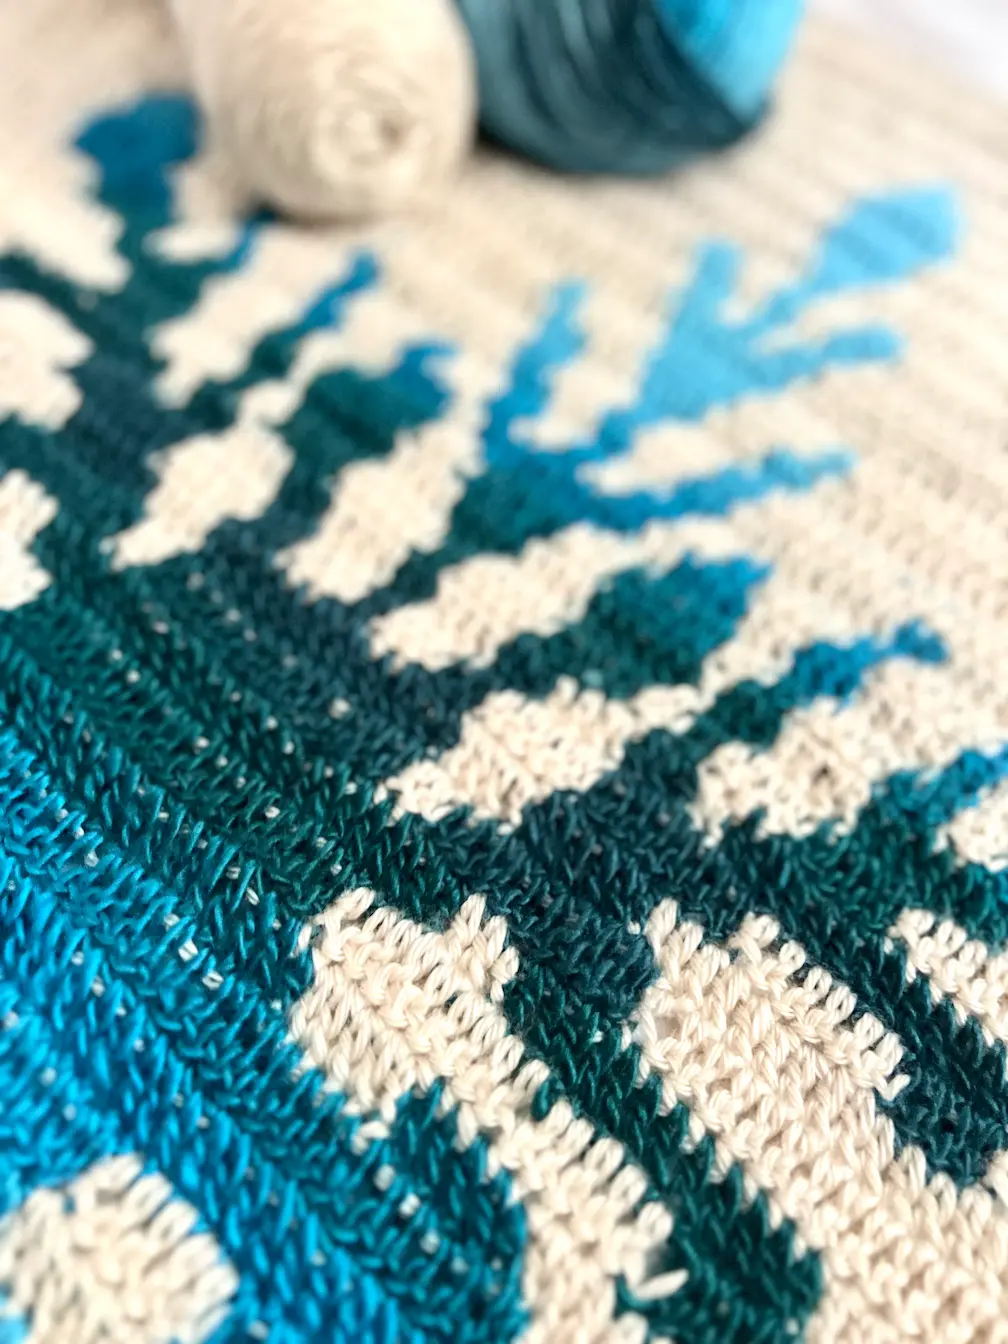
Colour A - White - Mary Maxi Best Value, Cottonwood, 170g/6oz, 313m/342yd, 100% Acrylic, Medium 4
Colour B - Mary Maxim Prism, Tycoon, 100g/3.5oz, 265m/290yd, 100% Acrylic, Light 3
Yarn Used:
Colour A approx.: 5 skeins (1565m/1710yd)
Colour B approx: 1 skein (225m/246yd)
Hooks - 5mm/H/8
Scissors, Yarn Needle, Stitch Marker (optional)
Gauge - 15sts x 8rows = 4” x 4”, 10cm x 10cm
Final measurements of the throw - 41” x 53” (with the border, approximately)
NOTES:
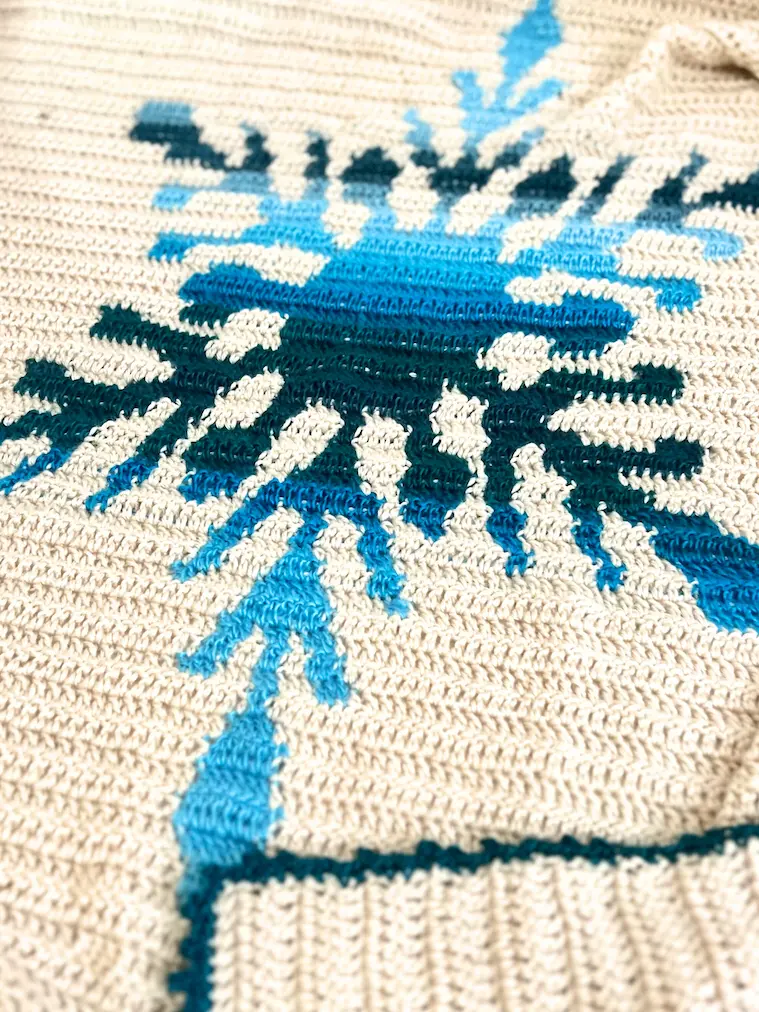
This pattern is worked entirely in Double Crochet (DC).
Every row ends with a turning chain of 2, which counts as the first DC of the next row.
At the end of each row, work your final DC into the very last stitch — this is the top of the turning chain (2nd chain)from the previous row. Make sure not to skip it to keep the correct number of stitches.
You may see stitch counts written like 74A, 2B, 74A throughout the pattern.. Each number tells you how many stitches to work, and each letter tells you which colour to use. For example::74A = 74 stitches in Colour A, 2B = 2 stitches in Colour B
Abbreviations:
Ch - chain
FDC - foundation double crochet
St - stitch
DC - double crochet
Sl St - Slip Stitch

HOW TO SIZE UP OR DOWN THE BLANKET
Because this is a graphghan with specific stitch counts for the snowflake design, adjusting the size requires a few considerations. Here are the easiest ways to make your blanket bigger or smaller:
Use a different hook size or yarn weight
To size up: use a larger hook, thicker yarn, or both.
To size down: use a smaller hook, thinner yarn, or both.
This keeps the stitch counts the same while changing the overall dimensions.
Adjust the surrounding rows or columns
If you want to keep the same yarn weight, hook size, and snowflake design, you can add or remove rows and/or columns evenly around the snowflake section.
This allows the snowflake motif to stay the exact same size while the blanket grows or shrinks around it.
TIPS & TRICKS
This pattern includes two helpful techniques demonstrated in the video tutorial to make your crocheting faster and neater:
1.Invisible Knot for Joining Yarn (YouTube tutorial: 6.48)
If you prefer to avoid weaving in ends, this method is perfect. You will run out of Colour A during the project, and the invisible knot lets you join a new yarn seamlessly without leaving extra ends to weave in later.
2. How to Crochet 2+ Double Crochet Rows at Once (YouTube tutorial: 2.59)
This technique is a total game changer—especially at the beginning of the blanket, where you work 23 rows in a single colour. It lets you work multiple rows at once, saving time while keeping the stitch structure intact.
DIRECTIONS
Option 1: Ch 151 (DC into the 3rd ch from the hook), DC in every ch until the end of the row (you should have 150 in colour A. Ch 2 (counts as a first DC stitch for the following row). Turn. Continue with ROW 2.
OR
Option 2: ROW 1 - Foundation DC Row (count as a first row) - 150, Ch 2 (count as a first DC stitch for the following row), turn.
ROW 2 - ROW 23 - 150A
ROW 24 - 74A, 2B, 74A
ROW 25 - 73A, 4B, 73A
ROW 26 - 72A, 6B, 72A
ROW 27 - 71A, 8B, 71A
ROW 28 - 29 - 72A, 6B, 72A
ROW 30 - 73A, 4B, 73A
ROW 31 - 74A, 2B, 74A
ROW 32 - 68A, 3B, 3A, 2B, 3A, 3B, 68A
ROW 33 - 69A, 3B, 2A, 2B, 2A, 3B, 69A
ROW 34 - 70A, 3B, 1A, 2B, 1A, 3B, 70A
ROW 35 - 71A, 8B, 71A
ROW 36 - 65A, 2B, 5A, 6B, 5A, 2B, 65A
ROW 37 - 66A, 3B, 4A, 4B, 4A, 3B, 66A
ROW 38 - 38A, 6B, 23A, 3B, 4A, 2B, 4A, 3B, 23A, 6B, 38A
ROW 39 - 38A, 7B, 5A, 2B, 5A, 2B, 9A, 3B, 3A, 2B, 3A, 3B, 9A, 2B, 5A, 2B, 5A, 7B, 38A
ROW 40 - 38A, 8B, 5A, 2B, 5A, 2B, 4A, 2B, 3A, 3B, 2A, 2B, 2A, 3B, 3A, 2B, 4A, 2B, 5A, 2B, 5A, 8B, 38A
ROW 41 - 39A, 9B, 4A, 2B, 4A, 3B, 2A, 5B, 2A, 10B, 2A, 5B, 2A, 3B, 4A, 2B, 4A, 9B, 39A
ROW 42 - 43A, 7B, 2A, 3B, 4A, 2B, 2A, 6B, 3A, 6B, 3A, 6B, 2A, 2B, 4A, 3B, 2A, 7B, 43A
ROW 43 - 48A, 7B, 4A, 3B, 1A, 6B, 4A, 4B, 4A, 6B, 1A, 3B, 4A, 7B, 48A
ROW 44 - 51A, 5B, 4A, 2B, 2A, 5B, 5A, 2B, 5A, 5B, 2A, 2B, 4A, 5B, 51A
ROW 45 - 45A, 13B, 2A, 3B, 4A, 3B, 4A, 2B, 4A, 3B, 4A, 3B, 2A, 13B, 45A
ROW 46 - 45A, 4B, 6A, 8B, 5A, 3B, 3A, 2B, 3A, 3B, 5A, 8B, 6A, 4B, 45A
ROW 47 - 58A, 6B, 4A, 14B, 4A, 6B, 58A
ROW 48 - 56A, 10B, 2A, 14B, 2A, 10B, 56A
ROW 49 - 48A, 12B, 3A, 24B, 3A, 12B, 48A
ROW 50 - 48A, 4B, 14A, 18B, 14A, 4B, 48A
ROW 51 - 55A, 5B, 5A, 20B, 5A, 5B, 55A
ROW 52 -53 - 53A, 44B, 53A
ROW 54 - 55A, 5B, 5A, 20B, 5A, 5B, 55A
ROW 55 - 48A, 4B, 14A, 18B, 14A, 4B, 48A
ROW 56 - 48A, 12B, 3A, 24B, 3A, 12B, 48A
ROW 57 - 56A, 10B, 2A, 14B, 2A, 10B, 56A
ROW 58 - 58A, 6B, 4A, 14B, 4A, 6B, 58A
ROW 59 - 45A, 4B, 6A, 8B, 5A, 3B, 3A, 2B, 3A, 3B, 5A, 8B, 6A, 4B, 45A
ROW 60 - 45A, 13B, 2A, 3B, 4A, 3B, 4A, 2B, 4A, 3B, 4A, 3B, 2A, 13B, 45A
ROW 61 - 51A, 5B, 4A, 2B, 2A, 5B, 5A, 2B, 5A, 5B, 2A, 2B, 4A, 5B, 51A
ROW 62 - 48A, 7B, 4A, 3B, 1A, 6B, 4A, 4B, 4A, 6B, 1A, 3B, 4A, 7B, 48A
ROW 63 - 43A, 7B, 2A, 3B, 4A, 2B, 2A, 6B, 3A, 6B, 3A, 6B, 2A, 2B, 4A, 3B, 2A, 7B, 43A
ROW 64 - 39A, 9B, 4A, 2B, 4A, 3B, 2A, 5B, 2A, 10B, 2A, 5B, 2A, 3B, 4A, 2B, 4A, 9B, 39A
ROW 65 - 38A, 8B, 5A, 2B, 5A, 2B, 4A, 2B, 3A, 3B, 2A, 2B, 2A, 3B, 3A, 2B, 4A, 2B, 5A, 2B, 5A, 8B, 38A
ROW 66 - 38A, 7B, 5A, 2B, 5A, 2B, 9A, 3B, 3A, 2B, 3A, 3B, 9A, 2B, 5A, 2B, 5A, 7B, 38A
ROW 67 - 38A, 6B, 23A, 3B, 4A, 2B, 4A, 3B, 23A, 6B, 38A
ROW 68 - 66A, 3B, 4A, 4B, 4A, 3B, 66A
ROW 69 - 65A, 2B, 5A, 6B, 5A, 2B, 65A
ROW 70 - 71A, 8B, 71A
ROW 71 - 70A, 3B, 1A, 2B, 1A, 3B, 70A
ROW 72 - 69A, 3B, 2A, 2B, 2A, 3B, 69A
ROW 73 - 68A, 3B, 3A, 2B, 3A, 3B, 68A
ROW 74 - 74A, 2B, 74A
ROW 75 - 73A, 4B, 73A
ROW 76 - 77 - 72A, 6B, 72A
ROW 78 - 71A, 8B, 71A
ROW 79 - 72A, 6B, 72A
ROW 80 - 73A, 4B, 73A
ROW 81 - 74A, 2B, 74A
ROW 82 - 104 - 150A
HOW TO CROCHET PICOT BORDER
Start anywhere along the edge — I personally like beginning in one of the corners.
Insert your hook into the chosen stitch. Place the snowflake colour yarn over your hook, pull up a loop, and chain 1 to join the yarn. Into the same stitch, make 1 SC. SC into the next stitch. Ch 3, then sl st into the first chain to create the picot.
Repeat the sequence SC, SC, Ch 3 + Sl St into the first ch all the way around the blanket.
Work this repeat evenly along all edges. Slip stitch to the first SC to close the round, fasten off, and weave in the final end.
Ta-Da! Your Northern Flakes Blanket is all finished, and I truly hope you loved making it as much as I loved designing it.
If this pattern brought you joy, taught you something new, or simply kept you company on a cosy day, I’d be so grateful if you shared it, left a comment, or gave it a little love. Your feedback means the world to me and helps me keep creating more free crochet patterns for you.
And if you make your own Northern Flakes Blanket, please tag me on Instagram @happyheartsy — seeing your finished creations is honestly one of my favourite parts of this whole journey. It always makes my day.
Happy Crocheting,
Lenka


Comments