
Summer Glow Crochet Top – Free Pattern & Breezy Twist Front Tutorial
- Aug 15, 2025
- 10 min read
Updated: Jan 13
When I came up with the Summer Glow Crochet Top, I wanted something light, fun, and easy to make your own. This pattern is fully customizable to any size — no strict stitch counts, just simple steps you can follow to get the perfect fit.
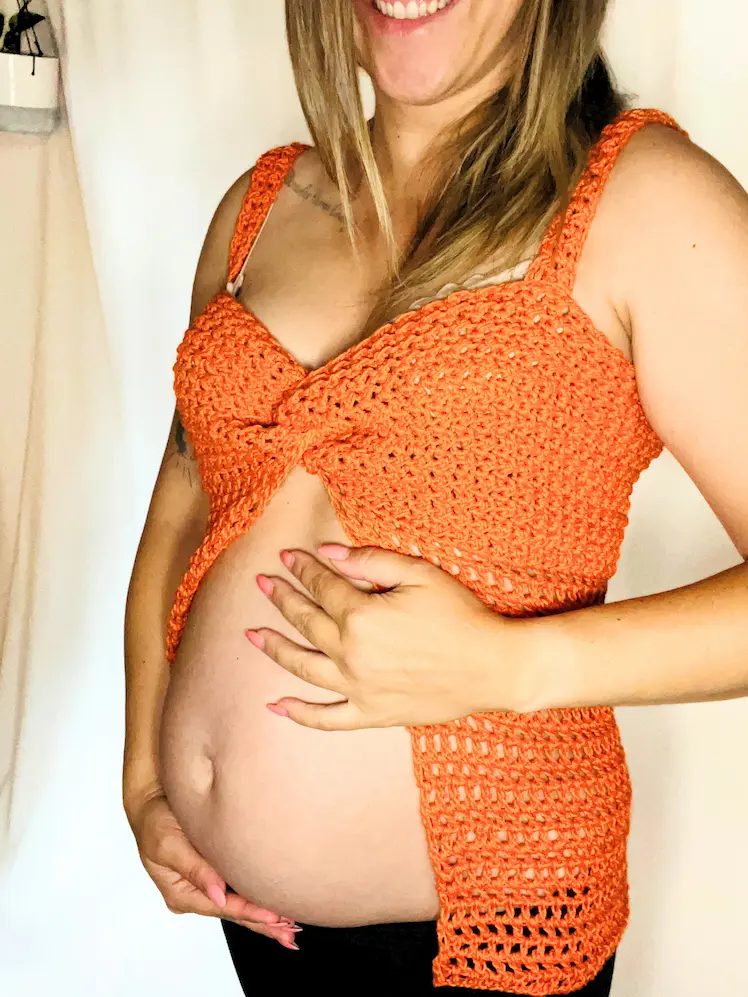
I’ll be wearing mine while pregnant, but it’s definitely not just for maternity. The breezy twist front makes it great for hot summer days — whether you’re showing off a baby bump or just love a cute, belly-baring style. It’s one of those pieces that feels as good to make as it does to wear. 🌞
If you'd like to support my work and get a printable, ad-free version of this pattern, please visit my shop or Ravelry.
If you like my crochet content but aren't interested in buying my patterns, that's perfectly fine. :) I offer my patterns for free on my blog so everyone can access them!
Additionally, there's an alternative way to support my work through Buy Me a Coffee (in my case, it's Buy Me Yarn, and you know the reason:) ). It's even cheaper than my current patterns. For more information, you can click the link above or the button below.
HUGE THANKS to everyone who supports me through purchases, likes, shares, comments, tags, or feedback! It truly means a lot to me.

This post contains affiliate links for the yarns I used and love and it also displays ads. I make a small commission if you purchase through these links or through the Ads which in no way affects the cost to you. The revenue I receive from Ads, and affiliate links, help me to support my small business which allows me to share my free crochet patterns/content with you. Thank you for your understanding and your support! It means a lot to me.
This pattern and all images associated with this pattern cannot be sold or claimed as your own.
You are allowed to sell finished project. Feel free to mention me for creating this pattern, it would make my day and I can share your finished blanket on my social media if you allow.
Don’t forget to share your project on Instagram! If you have your account you can tag me under
@happyheartsy. I would love to see your finished Happy Stripes Sweater so I can share it with others.
Before we get into the actual pattern I also created the Ultimate Crochet Hack Sheet! It's 2 pages with basic
crochet abbreviations and symbols, hook sizes in US and UK version, all the yarn types (with recommended hooks and projects) etc. Feel free to click on the pic or a link to my shop where you can find more details.

What you need for this Happy Stripes Sweater:
Hook - 4mm/US G-6
Scissors, Yarn Needle, Stitch Markers, Measure tape, Calculator
Measurements: There are no specific measurements for each size, as the pattern is uniquely customized to fit your body.
No ease is recommended for the twisted bust section—it should fit snugly and sit flat against your body for the best look and support.
Gauge: You’ll create your own gauge swatch to make this pattern fit properly.
For the reference - My gauge swatch for the twisted section (the only part where gauge is crucial): 4" x 4" = 15 sts x 17 rows

NOTES:
This pattern is fully customizable to fit your unique body type, so there are no specific stitch counts for standard sizes. You’ll calculate your own stitches—but don’t worry! I’ll guide you through each step with clear and simple instructions.
You absolutely cannot skip the gauge swatch. It’s not optional. Your stitch count depends on it—without a swatch, you won’t be able to follow the pattern correctly or get a good fit.
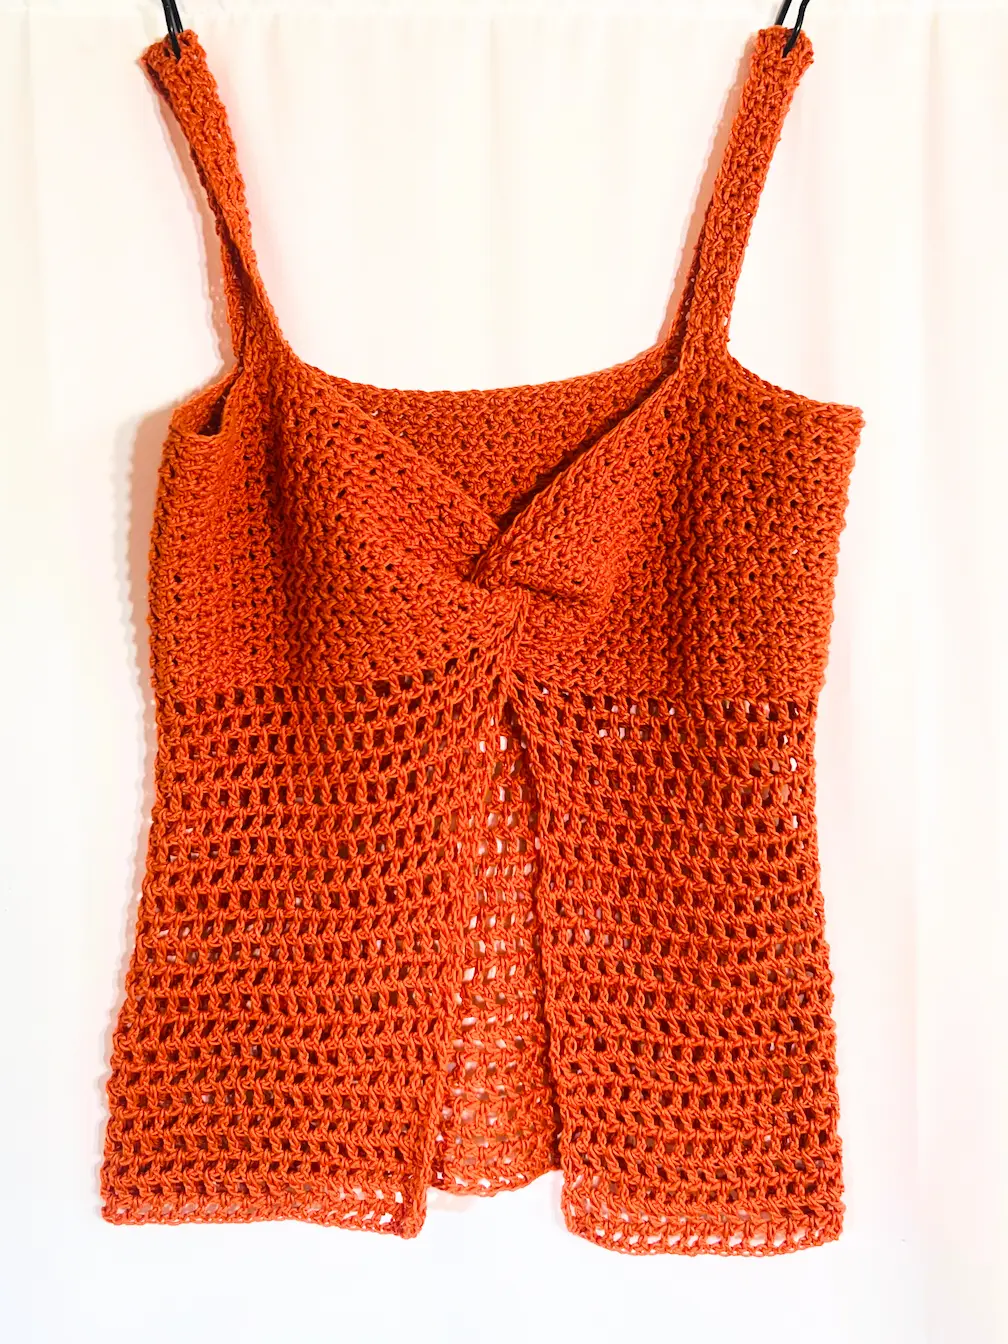
This Summer Top is worked from the top down, so the length is entirely up to you. Crop it, make it longer, or anything in between—your top, your style.
Abbreviations:
Ch - Chain
YO - Yarn Over
St - Stitch
HDC - Half Double Crochet
Sl St - Slip Stitch
DC - Double Crochet
Ch Sp - Chain Space

DIRECTIONS
TWISTED TOP PART
Let’s get started with the top twisted part, where it’s crucial to make your own gauge swatch.
How to make the gauge swatch:
For the top section, you’ll be using the Even Moss Stitch. If you'd like a full tutorial pack for this stitch, feel free to visit the link on my blog. However, this pattern and the included video explain it clearly as well.
How to crochet the Even Moss Stitch
Start with any even number of foundation chains (FCH). For the gauge swatch, you’ll need at least a 4" square to determine your gauge, so starting with 24 FCH is a good choice.
ROW 1 - Make a Half Double Crochet (HDC) into the 2nd chain (ch) from the hook. (The skipped ch 1 is just a turning chain—this gives you the odd number of stitches needed for this pattern.)
Into the next ch, make a Slip Stitch (Sl St). Continue alternating HDC, Sl St across the row, ending with a HDC as your last stitch. Ch 1 and turn.
ROW 2 - Make a Slip Stitch (Sl St) into the first stitch. (You’ll always make the opposite stitch from the one directly below. From now on, every even-numbered row will start with a Sl St, and every odd-numbered row will start with a HDC.)
Into the next stitch, make a Half Double Crochet (HDC). Continue alternating Sl St and HDC across the row, ending with a Sl St. Ch 1 and turn.
ROW 3 to at least ROW 22 – Repeat ROW 1 (starting with HDC) and ROW 2 (starting with Sl St), alternating between them until you have at least 22 rows or enough to measure a 4" square.
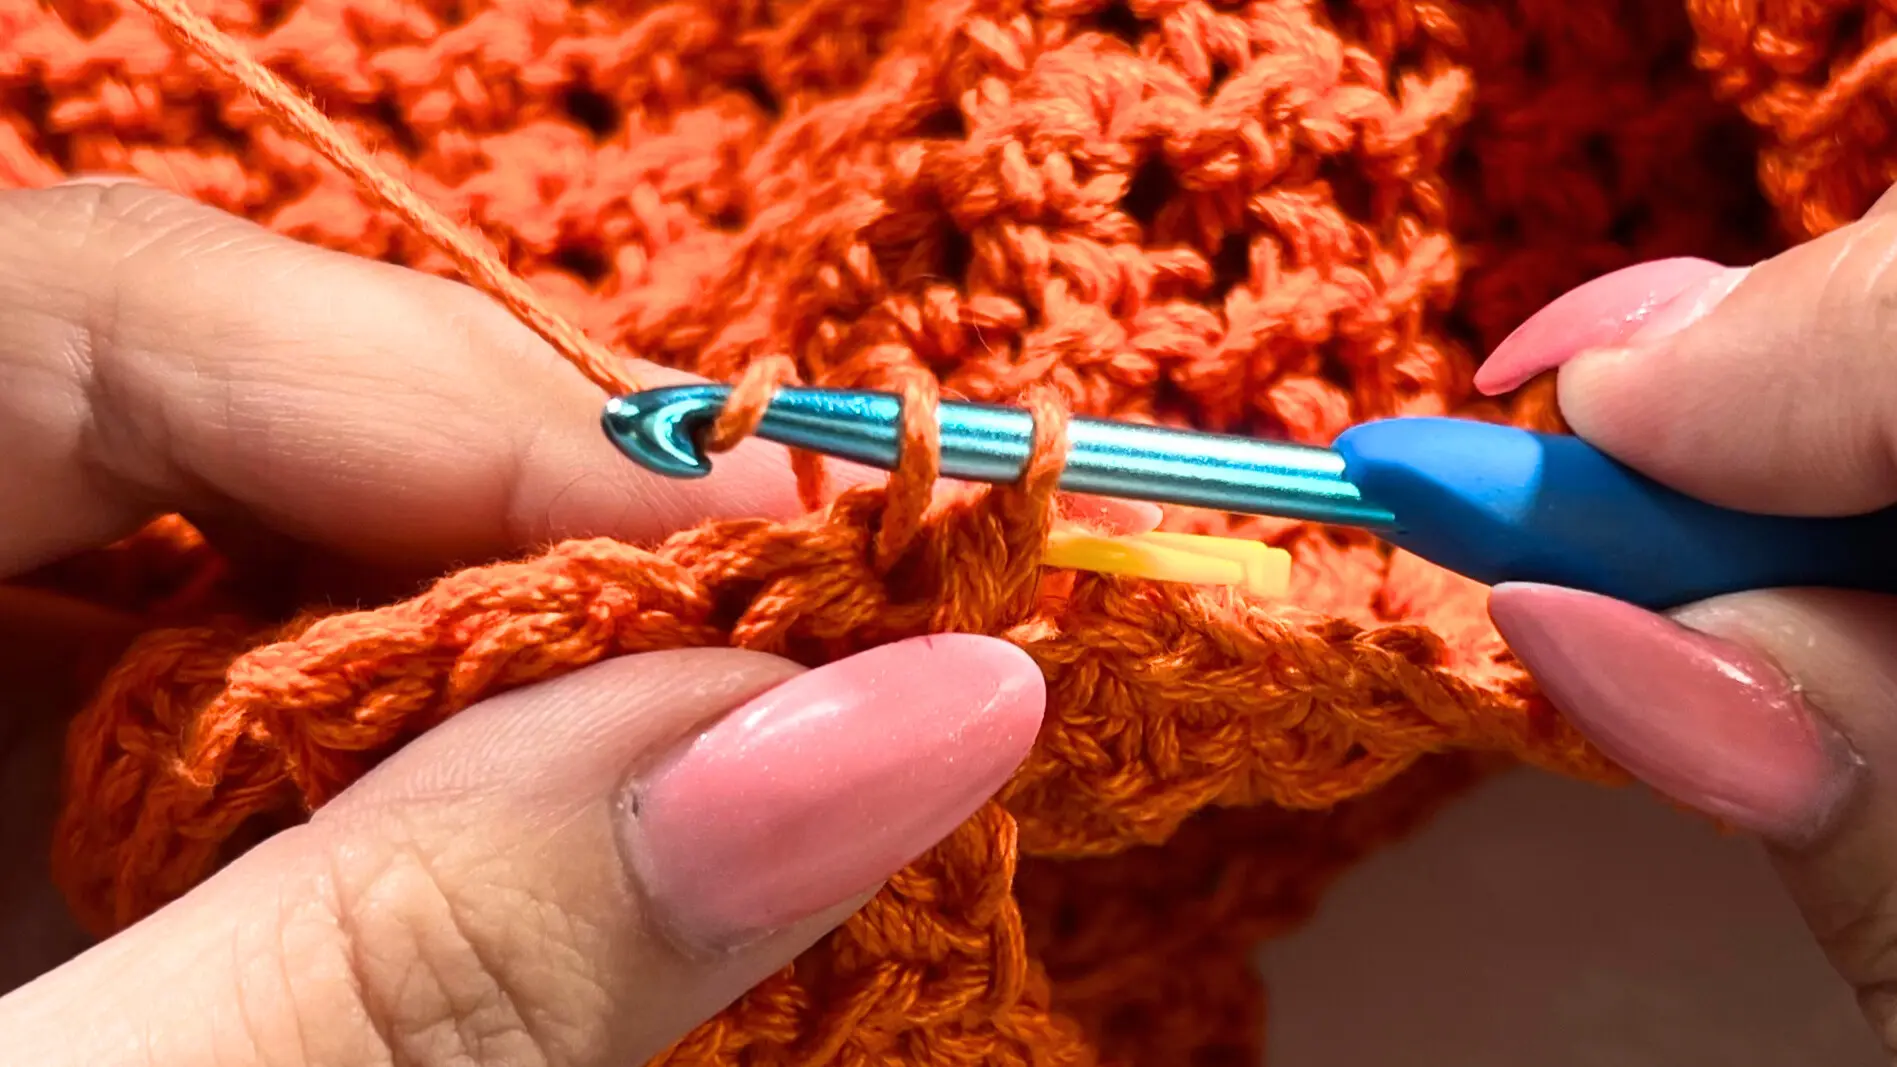
Once you finish the rectangle for your actual top (not the gauge swatch), leave a longer yarn tail—you’ll need it to seam the twisted section later.
TIP: A helpful way to check if you’re alternating the stitches correctly— When you insert your hook into a tighter stitch (your Sl St from the previous row), you should be making a HDC. When the stitch feels looser, that’s where you make a Sl St.
Once you’ve finished your gauge swatch, it’s time to count how many stitches and rows you have within a 4" square—horizontal for stitches, vertical for rows.
Make a note of your stitch and row count from your 4" square—you’ll use these numbers to calculate your custom fit for the top.
My gauge swatch (4" x 4")
Stitches -
Rows -
My Custom Stitch Calculation
Now grab your measuring tape and measure your bust circumference—preferably while wearing the bra you plan to wear under the top (if you wear one). Then, measure your cup height, as this will help determine how many rows you'll need for the twisted section.
My Bust Measurement - in inches
My Cup Measurement - in inches
Now that you have the most important numbers, it’s time to calculate how many stitches you’ll need for the top twisted section!
Stitches Count
Take the number of stitches from your 4" gauge swatch and divide it by 4 to get your stitches per inch.
Then, multiply that number by your bust measurement (in inches).
You’ll get a total stitch count—round it to the nearest odd number, since you’ll need an odd number of stitches for the top twisted section.
Stitches:
___sts (from your gauge swatch) : 4" = ___ (sts per 1")
___ (sts per 1") x ___ (bust measurement in inches) = ____________ → This is your stitch count (round to the nearest odd number if needed).
Rows Count
Take the number of rows from your 4" gauge swatch and divide it by 4 to get your rows per inch.
Then, multiply that number by your cup measurement (in inches).
You’ll get a total row count. It doesn’t matter if this number is even or odd.
Rows:
___rows (from your gauge swatch) : 4" = ___ (rows per 1")
___ (rows per 1") x ___ (cup measurement in inches) = ____________ → This is your row count (even or odd is totally fine).
Now you have all the numbers you need for your twisted top section, so let’s get started!
Go back to the instructions for the gauge swatch and follow the pattern for the Even Moss Stitch. Once you’ve made a few more rows for your rectangle, do a quick fitting check—wrap it around your bust to see how it fits. Keep in mind, the twist will make it a bit tighter. If it already feels too loose, you may want to adjust by using fewer stitches before moving on.
IMPORTANT!
For your Foundation Chain, add one extra chain to your odd stitch count. You’ll start crocheting into the 2nd chain from the hook, which will give you the correct odd number of stitches needed for this section.
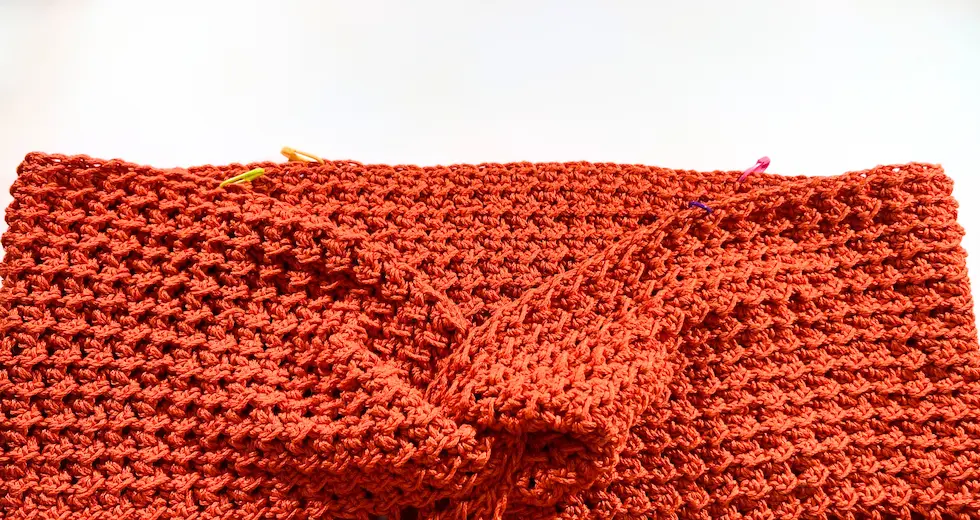
This is what your rectangle should look like before twisting it. (See photo below for reference.)

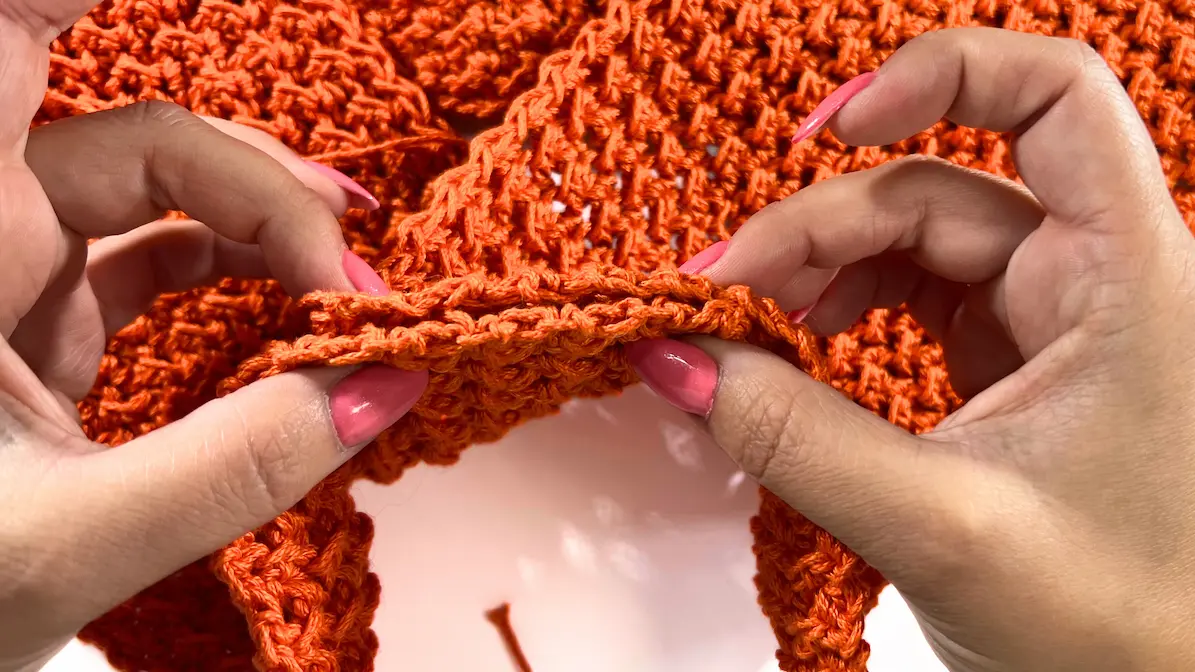
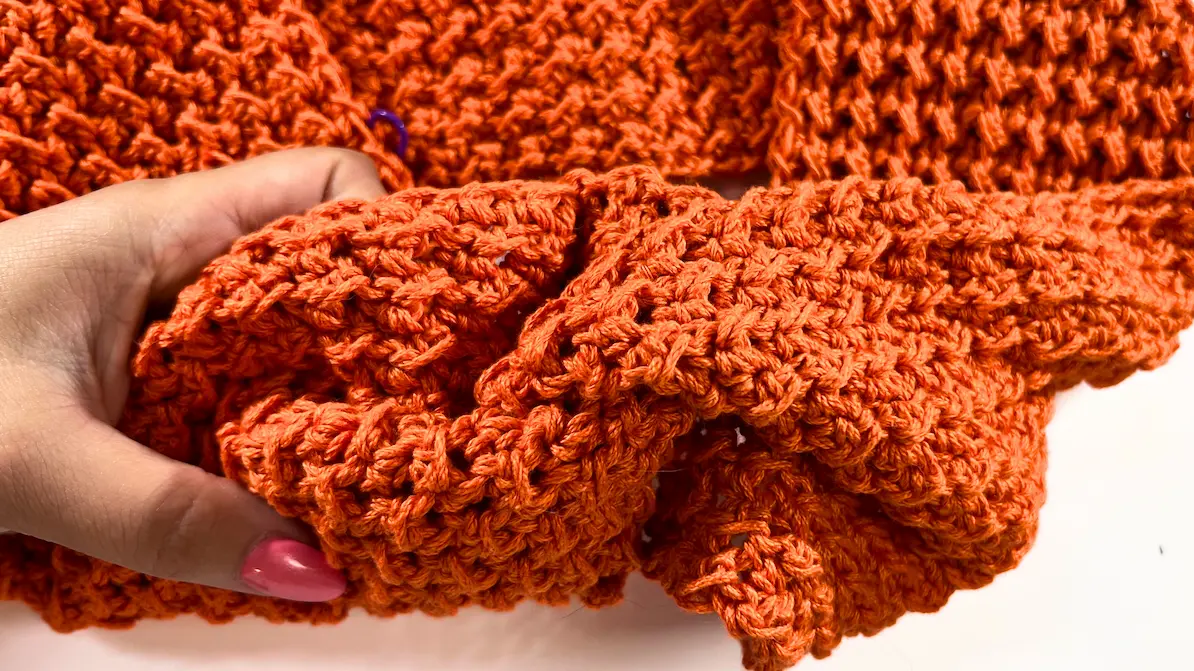
HOW TO TWIST THE RECTANGLE
Now that you’ve finished your rectangle, it’s time to create that beautiful twist for the top. Follow these steps:
Step 1 - Fold the shorter sides of your rectangle inward into beak shapes.

Step 2 - Bring the top parts of both beaks together. Then, fold the bottom part of the right beak underneath the layers you just stacked. Finally, place the bottom part of the left beak on the bottom—you should now have all layers folded into each other.
Now grab your yarn needle!
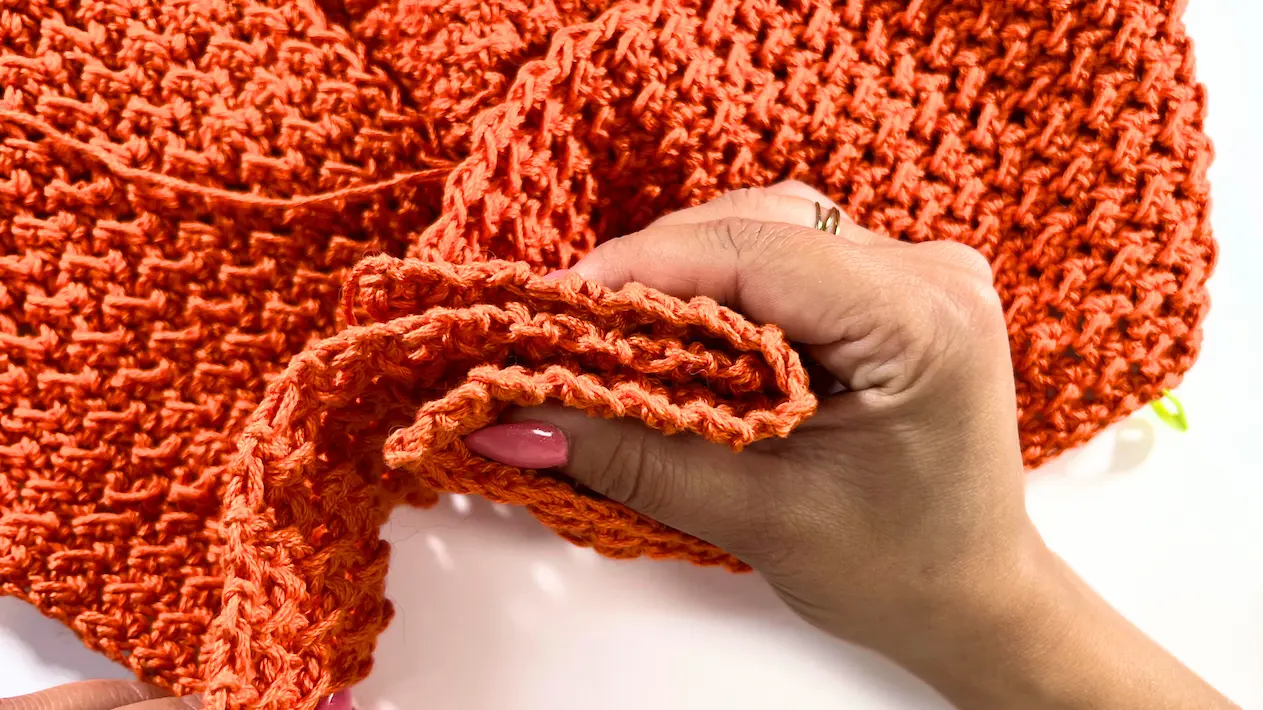
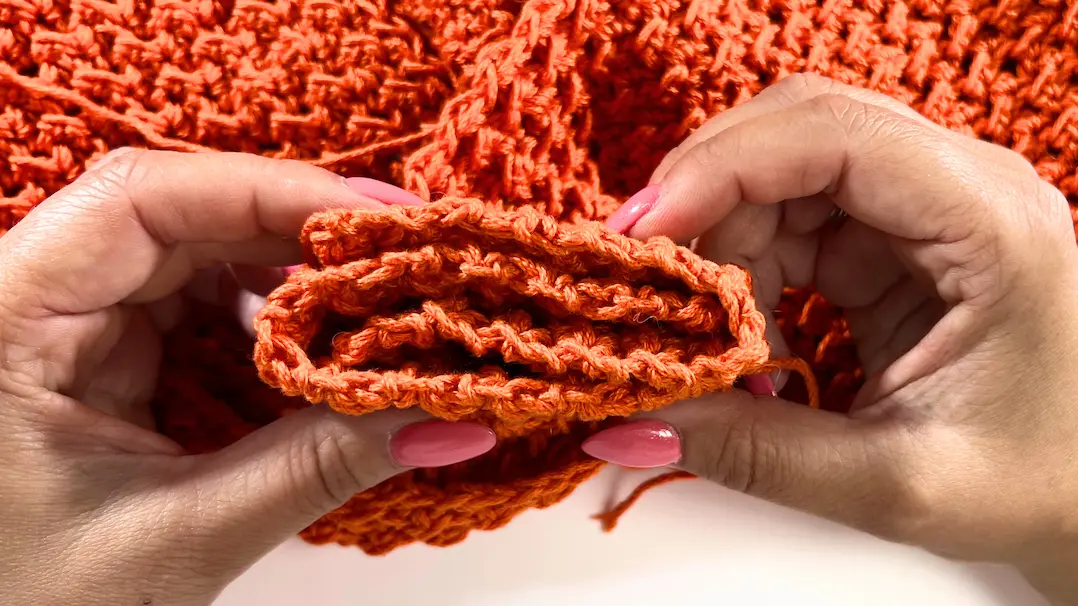
Step 3 -Thread your needle with the long tail you left when finishing the rectangle.
Start seaming through all four layers, working from top to bottom, then back up from bottom to top to reinforce the seam.
Always make sure your needle goes through all 4 layers each time. Once you’ve seamed it together, weave in the end, and then you can flip the project inside out. (Even Moss Stitch is reversible, so there’s no right or wrong side!)


BOTTOM PART
For the bottom part, you won’t need a gauge swatch, and you’ll be using the Mesh Stitch. Since the front of the top is open, you’ll be working in rows, not in the round.
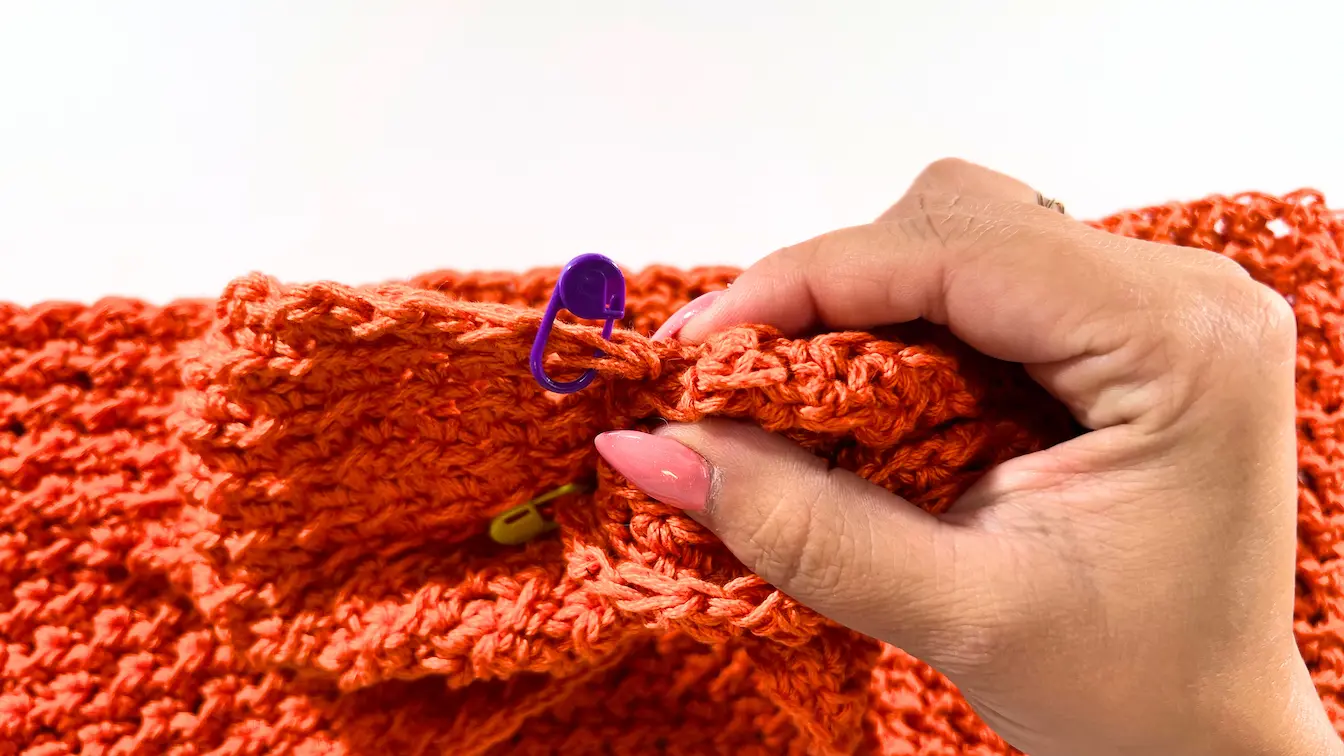
Feel free to use stitch markers to mark the first and last stitch for the bottom part. You’ll be crocheting directly into the bottom edge of the twisted top section. Your first stitch will go right at the edge of the twist—and your last stitch will land at the other edge.

Row 1 - Insert your hook into the first stitch at the bottom of the twisted part and join your yarn and make 3 chains (First 2 chains count as your first DC; the 3rd chain creates your Chain Space (Ch Sp)).

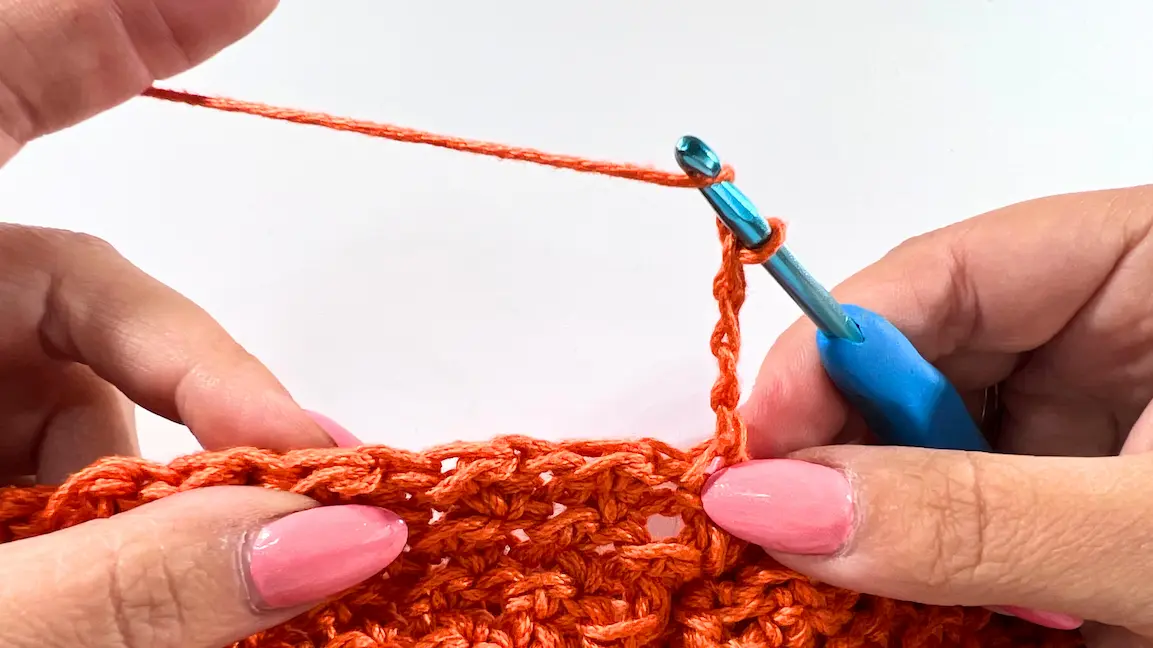
Now skip the next stitch, and into the following one, make a DC. Ch 1, skip one stitch, and into the next, make another DC.
Repeat this sequence—(DC, Ch 1, skip 1)—across the row until you reach the other side.

At the end if you have 2 stitches left, skip one and make your final DC into the last stitch. If you have 3 stitches left, don’t worry—this stitch pattern is very forgiving! Just skip one stitch and make your final DC into the next one, even if one stitch remains unworked. Ch 3 and turn.
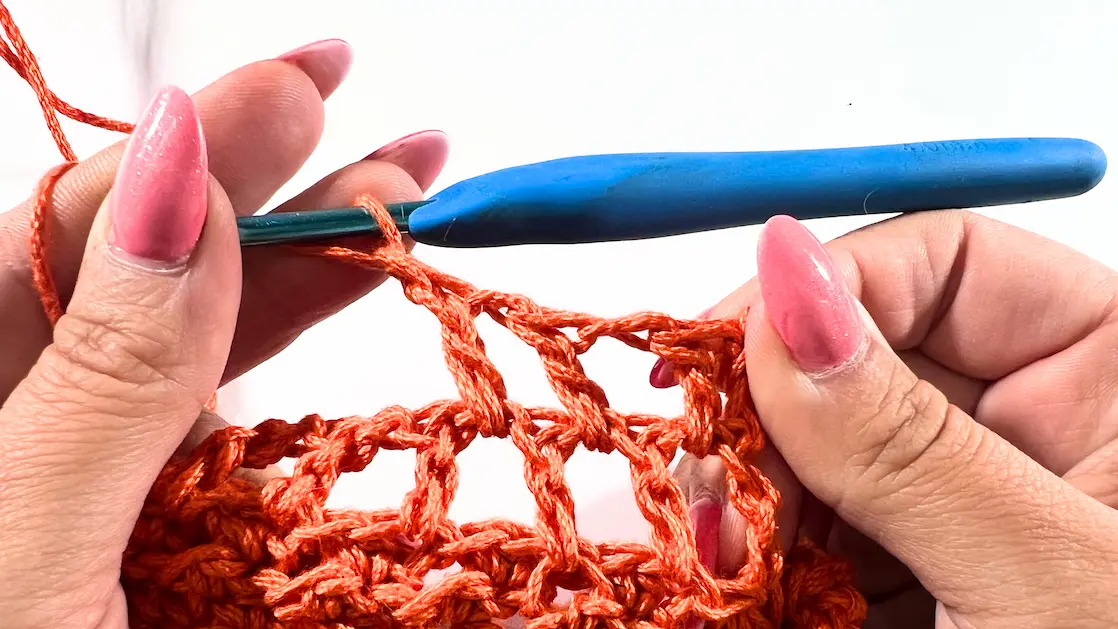
ROW 2 - Start with a DC into the first chain space (Ch Sp). Then continue the pattern: Ch 1, DC into the next Ch Sp, repeating all the way across. Your last DC will go into the last chain space.
For all following rows, simply repeat Row 2 until you reach your desired length.


STRAPS
It’s time for the last part—making the straps!
Do a quick fitting check: while wearing your summer top, use stitch markers to mark where your bra straps (if you wear one) sit, or simply where you’d like your crochet straps to be. It’s okay if the markers aren’t in the exact same stitch count on both sides.
Don’t forget to mark the strap positions on the back of the top too.
Once you take the top off, count how many stitches you have from the twisted part to the front stitch marker. Make a note of this number and then count the same number of stitches for the other front strap so they’re even.
Now, count the stitches from one front marker to the matching back marker on the same side. Repeat this for the other side to make sure the straps are evenly placed on both sides.

While you still have the summer top on, measure how long you’d like your straps to be.
I recommend making them slightly shorter than your measurement, since crochet straps can stretch a bit over time.
Please note: While crocheting your first strap, do fitting checks before joining it to the back—this will make sure it sits just right on your shoulder.
Don’t forget to write down the number of rows you made for the first strap, so you can make the second one exactly the same length. Once your stitch markers are in place, you can start your first strap.
Your stitch marker marks the middle stitch of the strap. For my top, I made each strap 5 stitches wide, with the third stitch holding the stitch marker. You can adjust the width to your liking—just make sure you use an odd number of stitches for the strap.

ROW 1 - Insert your hook into the first stitch of the strap section and join your yarn. You’ll be working the Even Moss Stitch again, starting your first row with HDC into the same stitch as you joined the yarn (and ending the row with HDC). Ch 1 and turn.

ROW 2 - Start this row with Sl St (and ending the row with Sl St). Ch 1 and turn.
TIP: You can scroll back to the Even Moss Stitch instructions above—it's exactly the same, just with a smaller stitch count for the straps.
ROW 3 - until your desired length = Continue repeating Rows 1 and 2 until your strap reaches the length you want. Make sure to count your rows so you can make the second strap exactly the same. Keep doing fitting checks before joining the strap to the back to ensure the fit is perfect.
How to join the straps to the other side:
First, make sure your straps are not twisted.
The stitch marker on the other side marks the middle stitch of the strap, so be sure to align it correctly. You can use stitch markers to temporarily attach the strap and do a fitting check—this way you can adjust the length or placement if needed. Make sure to repeat the same process for the other strap as well.
Once everything is aligned, simply work single crochet (SC) through each stitch—matching the first stitch of the strap with the first stitch on the other side—until the strap is securely attached.


Comments